Frequently Asked Questions
How do I get dense traffic?
- Use more traffic slots. This is the most important setting. It is pretty much impossible to achieve high traffic density with just 10 traffic cars, for example.
- Decrease
MinAiSafetyDistanceMeters/MaxAiSafetyDistanceMetersto make gaps between AI cars smaller.
Don't set it lower than ~12m or you might experience AI cars braking immediately after spawning! - Decrease
MinSpawnDistancePoints/MaxSpawnDistancePointsto spawn cars closer to the player and fill up gaps in traffic.
Why can't I drive certain cars on my server?
Certain car mods are designed to only be driven on servers that are whitelisted by the creators of the car mod.
Affected cars usually do not respond to the gas pedal input if they are used on other servers.
This restriction is built into the car mod itself and cannot be deactivated by any means.
Please note that these restrictions are not a feature of AssettoServer.
Why am I spawning in a different location than expected?
Where you spawn depends on where the pit for each index is located for track and layout that you chose.
For example, the Overload Layout of Shutoko Revival Project combines all 170 pits into a single layout.
Because of that, it is possible to spawn in different locations depending on the index that each car has in the entry_list.ini.
Here is a short list of which indices correspond to which spawn location for the Shutoko Revival Project - Overload Layout:
| Car Indices | Spawn Location |
|---|---|
[CAR_0] to [CAR_39] | Tatsumi PA |
[CAR_40] to [CAR_67] | Shibaura PA |
[CAR_68] to [CAR_86] | Yoyogi PA |
[CAR_87] to [CAR_139] | Heiwajima PA - Northbound |
[CAR_140] to [CAR_155] | Heiwajima PA - Southbound |
[CAR_156] to [CAR_169] | Daishi PA |
It is not possible to skip or have duplicate indices in entry_list.ini.
This means that you cannot start your entry list with [CAR_87] to have all cars spawn in Heiwajima, or have multiple [CAR_0] entries to have more than 40 cars spawn in Tatsumi.
How do I remove checksums?
Only remove checksums if you're okay with users cheating.
Checksums are required to prevent people from cheating by modifying their car and track data.
Remove them at your own risk.
- Car Checksums
- Track Checksums
- Navigate to the
\content\carsfolder on your server. - Remove the
data.acdin the folder of every car that you want to use without checksums. - Enable MissingCarChecksums in
extra_cfg.ymland restart the server. - If you've done everything correctly you should no longer see a
Added checksum for car_namelog message for the car you removed. If you've removed the checksum of all cars it should also logInitialized 0 car checksums.
- Navigate to the
\content\tracks\<track>\<layout>\dataand\systemfolders on your server. - Remove both of the
surfaces.inifiles and restart the server. - If you've done everything correctly you should see the log message saying
Initialized 0 track checksums
If you added any other checksums like track kn5's or car colliders, also remove those files.
How do I add missing track params?
You can either add the parameters locally or ignore this error by setting MissingTrackParams to true in extra_cfg.yml.
Keep in mind that setting MissingTrackParams to true can result in time not being synchronized between players and the server.
- Create New
- Reuse Existing
Navigate to the cfg folder of the server and open the data_track_params.ini.
Go to the bottom of the file and add a section for your track using the folder name of your track as the header like this:
[shuto_revival_project_beta_ptb]
NAME=SRP PTB
LATITUDE=
LONGITUDE=
TIMEZONE=
Open Google Maps and find the location of the track.
Right click onto the map and click the Longitute and Latitute values that will be shown as the first option to copy them.

Paste them after the LATITUDE= and LONGITUDE= keys.
Open a TZ timezone list and look for the time zone that the track is in, then copy the TZ Identifier.

Paste it after the TIMEZONE= key.
You should now have something along the lines of this:
[shuto_revival_project_beta_ptb]
NAME=SRP PTB
LATITUDE=35.67040
LONGITUDE=139.74085
TIMEZONE=Asia/Tokyo
Navigate to the cfg folder of the server and open the data_track_params.ini.
Find and copy the entry for the track you want to reuse.
Change the header of the copied section to the folder name your current track.
; Original
[shuto_revival_project_beta]
NAME=SRP
LATITUDE=35.670479
LONGITUDE=139.740921
TIMEZONE=Asia/Tokyo
; Copied
[shuto_revival_project_beta_ptb]
NAME=SRP PTB
LATITUDE=35.670479
LONGITUDE=139.740921
TIMEZONE=Asia/Tokyo
Save and close the file, open extra_cfg.yml and set ForceServerParams to true.
Please also adjust MinimumCSPVersion if needed.
# Override minimum CSP version required to join this server. Leave this empty to not require CSP.
MinimumCSPVersion: 2144

# Force clients to use track params (coordinates, time zone) specified on the server. CSP 0.1.79+ required
ForceServerTrackParams: true
How do I use CSP extra server options?
Read this CSP wiki page carefully. Everything you want to add goes into cfg/csp_extra_options.ini.
If the file doesn't exist yet, create it yourself. For example:
Place the file in the cfg folder of your server.
If you're hosting the server via Content Manager, click the Folder button at the bottom of the preset and place it there instead.
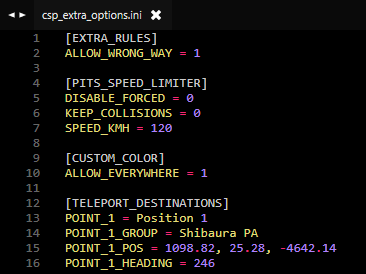
How do I allow driving the wrong way?
[EXTRA_RULES]
ALLOW_WRONG_WAY = 1
If you get teleported back to pits, you may need to remove the fast_lane.ai for the track in your local game files.
By default: C:\Program Files (x86)\Steam\steamapps\common\assettocorsa\content\tracks\<trackname>.
How do I enable Teleportation?
For teleporting, two things have to be done:
- Allowing cars in the entry list to teleport
- Adding teleport destinations to the
csp_extra_options.ini
Depending on if you have the full version of Content Manager or not, there are two different ways to accomplish this:
- With Content Manager (Full Version)
- Without Content Manager
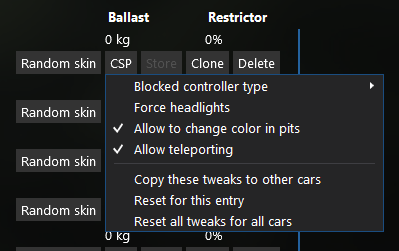
Check Allow teleporting for each car on your entry list:
Click on the Folder button at the bottom of your server, open csp_extra_options.ini and add your teleport destinations to it.

- In your
entry_list.iniadd a option to the end of each skin, for exampleSKIN=<skinname>/ADAn
| Code | Option |
|---|---|
/ACA3 | Allow Teleporting |
/ABAH | Allow Color Changing |
/ADAn | Allow both Color Changing & Teleporting |
This is NOT a full list of all codes and options available, just some of the most frequently used ones.
Here is how it’s generated by Content Manager.
- In the
cfgfolder of your server, opencsp_extra_options.iniand add your teleport destinations to it.
If done correctly you should now have a Teleport to... option in the chat apps extras:

Where can I find teleport locations for SRP?
Either use the teleports used on the official SRP servers below or make some yourself.
Official Shutoko Revival Project Teleport locations
Last updated: 2024-04-24
[TELEPORT_DESTINATIONS]
POINT_1 = Position 1
POINT_1_GROUP = Shibaura PA
POINT_1_POS = 1098.8,25.3,-4642.1
POINT_1_HEADING = 246

POINT_2 = Position 2
POINT_2_GROUP = Shibaura PA
POINT_2_POS = 1098.8,25.3,-4649.8
POINT_2_HEADING = 245

POINT_3 = Position 3
POINT_3_GROUP = Shibaura PA
POINT_3_POS = 1098.9,25.3,-4657.4
POINT_3_HEADING = 246

POINT_4 = Position 4
POINT_4_GROUP = Shibaura PA
POINT_4_POS = 1099.4,25.3,-4664.9
POINT_4_HEADING = 246

POINT_5 = Position 5
POINT_5_GROUP = Shibaura PA
POINT_5_POS = 1099.2,25.3,-4672.4
POINT_5_HEADING = 245

POINT_6 = Position 1
POINT_6_GROUP = Tatsumi PA
POINT_6_POS = 5862.1,23.3,-4649
POINT_6_HEADING = 267

POINT_7 = Position 2
POINT_7_GROUP = Tatsumi PA
POINT_7_POS = 5850.9,22.9,-4644.6
POINT_7_HEADING = 268

POINT_8 = Position 3
POINT_8_GROUP = Tatsumi PA
POINT_8_POS = 5839.7,22.5,-4640
POINT_8_HEADING = 268

POINT_9 = Position 1
POINT_9_GROUP = Daishi PA
POINT_9_POS = -308.6,15.5,6143.8
POINT_9_HEADING = 68

POINT_10 = Position 2
POINT_10_GROUP = Daishi PA
POINT_10_POS = -308.5,15.5,6150.7
POINT_10_HEADING = 68

POINT_11 = Position 3
POINT_11_GROUP = Daishi PA
POINT_11_POS = -308.1,15.4,6157.9
POINT_11_HEADING = 66

POINT_12 = Position 1
POINT_12_GROUP = Heiwajima PA North
POINT_12_POS = -230.1,12.3,1360
POINT_12_HEADING = 104

POINT_13 = Position 2
POINT_13_GROUP = Heiwajima PA North
POINT_13_POS = -234.9,12.3,1354.1
POINT_13_HEADING = 106

POINT_14 = Position 3
POINT_14_GROUP = Heiwajima PA North
POINT_14_POS = -239.8,12.3,1348.1
POINT_14_HEADING = 105

POINT_15 = Position 1
POINT_15_GROUP = Oi PA
POINT_15_POS = 964.9,6.7,-126.1
POINT_15_HEADING = 156

POINT_16 = Position 2
POINT_16_GROUP = Oi PA
POINT_16_POS = 964.9,6.8,-138
POINT_16_HEADING = 156

POINT_17 = Position 3
POINT_17_GROUP = Oi PA
POINT_17_POS = 964.8,6.8,-151.2
POINT_17_HEADING = 156

POINT_18 = Position 1
POINT_18_GROUP = Mirai - Kinko JCT
POINT_18_POS = -10854.3,12,13422.8
POINT_18_HEADING = 287

POINT_19 = Position 2
POINT_19_GROUP = Mirai - Kinko JCT
POINT_19_POS = -10846.2,12,13415.8
POINT_19_HEADING = 283

POINT_20 = Position 1
POINT_20_GROUP = Bayshore North - Kawasaki Port
POINT_20_POS = -83.8,7.1,10983.1
POINT_20_HEADING = 273

POINT_21 = Position 2
POINT_21_GROUP = Bayshore North - Kawasaki Port
POINT_21_POS = -103,7.7,10993.2
POINT_21_HEADING = 274

POINT_22 = Position 1
POINT_22_GROUP = C1 Outer - Edobashi JCT
POINT_22_POS = 2512.1,12.2,-9223.3
POINT_22_HEADING = 231

POINT_23 = Position 2
POINT_23_GROUP = C1 Outer - Edobashi JCT
POINT_23_POS = 2503.3,12,-9225.6
POINT_23_HEADING = 232

POINT_24 = Position 1
POINT_24_GROUP = Shinjuku Station
POINT_24_POS = -4251.7,32.9,-10032.5
POINT_24_HEADING = 208

POINT_25 = Position 2
POINT_25_GROUP = Shinjuku Station
POINT_25_POS = -4244.1,32.9,-10016.8
POINT_25_HEADING = 159

POINT_26 = Position 3
POINT_26_GROUP = Shinjuku Station
POINT_26_POS = -4242.9,33,-9995.6
POINT_26_HEADING = 160

POINT_27 = Position 1
POINT_27_GROUP = Yokohama - Daikoku
POINT_27_POS = -6147.9,29.6,13722.3
POINT_27_HEADING = 346

POINT_28 = Position 2
POINT_28_GROUP = Yokohama - Daikoku
POINT_28_POS = -6151.9,29.7,13702.2
POINT_28_HEADING = 347

POINT_29 = Position 1
POINT_29_GROUP = Heiwajima PA - South
POINT_29_POS = -135.8,6.6,1475.1
POINT_29_HEADING = 128

POINT_30 = Position 2
POINT_30_GROUP = Heiwajima PA - South
POINT_30_POS = -141.2,6.6,1463.3
POINT_30_HEADING = 132

POINT_31 = Position 3
POINT_31_GROUP = Heiwajima PA - South
POINT_31_POS = -146.6,6.5,1451.8
POINT_31_HEADING = 130

POINT_32 = Position 2
POINT_32_GROUP = C1 Inner - Ginza
POINT_32_POS = 2179.8,-1.7,-7541.2
POINT_32_HEADING = 291

POINT_33 = Position 1
POINT_33_GROUP = Bayshore North - Tamagawa River Tunnel
POINT_33_POS = 4104.2,-7.8,8489
POINT_33_HEADING = 304

POINT_34 = Position 2
POINT_34_GROUP = Bayshore North - Tamagawa River Tunnel
POINT_34_POS = 4121,-8.3,8463.5
POINT_34_HEADING = 303

POINT_35 = Position 1
POINT_35_GROUP = Bayshore South - Haneda Airport
POINT_35_POS = 3278.4,0.8,4292.5
POINT_35_HEADING = 197

POINT_36 = Position 2
POINT_36_GROUP = Bayshore South - Haneda Airport
POINT_36_POS = 3265.1,0.7,4278.1
POINT_36_HEADING = 199

POINT_37 = Position 1
POINT_37_GROUP = Kariba - Sakuragicho
POINT_37_POS = -7478.1,13,16477.6
POINT_37_HEADING = 22

POINT_38 = Position 1
POINT_38_GROUP = C1 Inner - Kitanomaru
POINT_38_POS = 767.5,16.5,-9914.9
POINT_38_HEADING = 87

POINT_39 = Position 2
POINT_39_GROUP = C1 Inner - Kitanomaru
POINT_39_POS = 782.8,16.5,-9921.3
POINT_39_HEADING = 89

POINT_40 = Position 1
POINT_40_GROUP = Belt Inner - Fukuzumi
POINT_40_POS = 4522.3,14,-8210.6
POINT_40_HEADING = 350

POINT_41 = Position 2
POINT_41_GROUP = Belt Inner - Fukuzumi
POINT_41_POS = 4524.7,14.3,-8199.7
POINT_41_HEADING = 349

POINT_42 = Position 1
POINT_42_GROUP = Yokohane - Kawasaki
POINT_42_POS = -2533.6,11,8864.5
POINT_42_HEADING = 86

POINT_43 = Position 1
POINT_43_GROUP = C1 Outer - Bayshore Access
POINT_43_POS = 1371.3,9.8,-6547.1
POINT_43_HEADING = 117

POINT_44 = Position 2
POINT_44_GROUP = C1 Outer - Bayshore Access
POINT_44_POS = 1363.8,9.7,-6537.6
POINT_44_HEADING = 118

POINT_45 = Position 1
POINT_45_GROUP = C1 Outer - Shibakoen
POINT_45_POS = 318,13,-5719.1
POINT_45_HEADING = 63

POINT_46 = Position 2
POINT_46_GROUP = C1 Outer - Shibakoen
POINT_46_POS = 305.9,12.8,-5720.3
POINT_46_HEADING = 61

POINT_47 = Position 1
POINT_47_GROUP = Shibuya - Takigicho
POINT_47_POS = -2171.6,36.8,-6448
POINT_47_HEADING = 72

POINT_48 = Position 2
POINT_48_GROUP = Shibuya - Takigicho
POINT_48_POS = -2159.5,36.8,-6449.3
POINT_48_HEADING = 73

POINT_49 = Position 1
POINT_49_GROUP = Shibuya Access
POINT_49_POS = -4581.4,34.7,-6013.5
POINT_49_HEADING = 80

POINT_50 = Position 2
POINT_50_GROUP = Shibuya Access
POINT_50_POS = -4754.6,34.7,-5830
POINT_50_HEADING = 12

POINT_51 = Position 1
POINT_51_GROUP = Yoyogi PA
POINT_51_POS = -4305.1,36.8,-8883.1
POINT_51_HEADING = 176

POINT_52 = Position 2
POINT_52_GROUP = Yoyogi PA
POINT_52_POS = -4313.3,36.7,-8883.1
POINT_52_HEADING = 174

POINT_53 = Position 3
POINT_53_GROUP = Yoyogi PA
POINT_53_POS = -4324.5,36.7,-8882.3
POINT_53_HEADING = 174

POINT_54 = Position 1
POINT_54_GROUP = C1 Inner - Shibakoen
POINT_54_POS = 100.3,12.2,-5830.6
POINT_54_HEADING = 191

POINT_55 = Position 2
POINT_55_GROUP = C1 Inner - Shibakoen
POINT_55_POS = 92.5,12.2,-5841.1
POINT_55_HEADING = 193

POINT_56 = Position 1
POINT_56_GROUP = Yokohane South - Shinagawa
POINT_56_POS = 550.8,12.4,-3796.7
POINT_56_HEADING = 133

POINT_57 = Position 1
POINT_57_GROUP = Bayshore North - Honmoku JCT
POINT_57_POS = -7075.9,32.9,16318.3
POINT_57_HEADING = 351

POINT_58 = Position 2
POINT_58_GROUP = Bayshore North - Honmoku JCT
POINT_58_POS = -7079,33.2,16306.4
POINT_58_HEADING = 351
How do I make my own teleport locations?
You can use the Objects Inspector or the comfy map app to determine the coordinates and heading.
The formating is as follows:
POINT_0 = Name               ; destination name
POINT_0_GROUP = Group Name   ; optional group
POINT_0_POS = X, Y, Z        ; coordinates
POINT_0_HEADING = 0          ; heading angle in degrees
Having the comfy map app is not necessary to create points, enable or use teleportation!
How do I enable Color Changing?
[CUSTOM_COLOR]
ALLOW_EVERYWHERE = 1
If AI cars are allowed to change their colors, they will spawn in random colors if possible.
Keep in mind that you still need to allow cars to change colors via the entry_list.ini even if you're using ALLOW_EVERYWHERE.
How do I increase the speed in the pits?
[PITS_SPEED_LIMITER]
KEEP_COLLISIONS = 0    ; will either activate or deactivate collisions between cars in the pits.
SPEED_KMH = 80         ; the maximum speed allowed, the default is 80.
There are more options available here.
How do I use Server Scripts?
Keep in mind that Server Scripts are different from AssettoServer Plugins, and we don’t provide support for them on our Discord.
You're going to need to host your script in plaintext somewhere publicly accessible, for example:
- Github / Pastebin
- Your own media server (like IIS or others)
- DO NOT HOST ON DISCORD
[SCRIPT_...]
SCRIPT = "https://pastebin.com/raw/00000000000"    ; change this to the url of your script
There are more options available here.
How do I allow players to download missing content?
It's possible to allow players to download missing content like tracks and cars in the Content Manager server browser. This can be done by either providing direct download links if the content is stored on a 3rd party file hosting service like GoogleDrive or by hosting the content directly on the server.

Via 3rd party file hosting services
Please use the download links the authors of the content you're using provide unless you're explicitly allowed to reupload them for yourself.
- With Content Manager (Full Version)
- Without Content Manager
- Navigate to the
DetailsTab in your Server preset. - In the
Share Modetab select "Download URL" and paste the direct download link into theDownload fromfield. - Leave
Version Requiredas it is since CM will autofill these for you, then save the preset. - A
content.jsonfile will be created in thecm_contentfolder under the directory of the server.
Currently, this file does not get included when using the Pack feature.

- Navigate to the
cfgfolder of your server. - Create a
cm_contentfolder and in that folder a file namedcontent.json. - In
content.jsonyou can now configure download links like so:
{
  "cars": {
    "car_name_here": {
      "url": "download url here",
      "version": "version here"
    },
    "car_name_two": {
      "url": "download url here",
      "version": "version here"
    }
  },
  "track": {
    "url": "download url here",
    "version": "version here"
  }
}
- The
versionhas to match the version shown in theAuthorfield in the content tab of the car/track.

Via the server directly
- With Content Manager (Full Version)
- Without Content Manager
-
Navigate to the
DetailsTab in your Server preset. -
In the
Share Modetab select "Download URL" and paste the direct download link into theShare from serverfield. -
Click the 3 little dots on the
Packed archiveline and either selectSelect existing archiveif you already have a packed archive or selectRepackto do so.
-
Leave
Version Requiredas it is since CM will autofill these for you, then save the preset. -
A
content.jsonfile will be created in thecm_contentfolder under the directory of the server.
If you used theRepackoption, the generated archives will also be added to this folder.
Currently, these files do not get included when using the Pack feature.
Content Manager automatically fills in the full path to each archive.
If you plan on moving these files (to a VPS for example), you will need to update the file: parameter for each entry in the content.json to reflect their new location.
- Navigate to the
cfgfolder of your server. - Create a
cm_contentfolder and in that folder a file namedcontent.json. - In
content.jsonyou can now configure paths to each archive like so:
{
  "cars": {
    "car_name_here": {
    "file": "path to archive here",
      "version": "version here"
    },
    "car_name_two": {
    "file": "path to archive here",
      "version": "version here"
    }
  },
  "track": {
    "file": "path to archive here",
    "version": "version here"
  }
}
- The
versionhas to match the version shown in theAuthorfield in the content tab of the car/track.
Instead of specifying the complete file path, you can just provide the path relative to AssettoServer's root directory.
For example: "file": "cfg/cm_content/car_name.zip",
How can I enable a Custom Steam API Replacement?
AssettoServer does not support piracy and as such there is no way around buying Assetto Corsa and the DLC's required by the content you want to use.
If you used a pirated version of Assetto Corsa in the past and have since purchased everything, make sure to:
- Verify your game files via Steam
- Change the Assetto Corsa game folder in the Content Manager general settings to your Steam installation.
By default:C:\Program Files (x86)\Steam\steamapps\common\assettocorsa\
How can I format my server description?
Linebreaks
The |- modifier is probably the most important part to properly format your description.
Read this site for more information: https://yaml-multiline.info/
BBcode
The description in Content Manager uses BBcode tags, read: https://www.bbcode.org/reference.php
To add images use [img=<link>]img1[/img]
Keep in mind that some functions of BBcode are not supported by Content Manager.
Example Description
ServerDescription: |-
  [img=https://assettoserver.org/img/as-logo-cm.png]AssettoServer Logo[/img]

  [size=16]                   [b]UNOFFICIAL AI TRAFFIC TEST SERVER[/b]

                Car and track downloads, installation help:
                          [url=https://discord.com/invite/shutokorevivalproject]Shutoko Revival Project Discord[/url]
                              Server news and feedback:
                      [url=https://discord.gg/uXEXRcSkyz]AssettoServer Development Discord[/url]
                                    [color=#FF424D]Support the server:[/color]
                                              [url=https://www.patreon.com/assettoserver]Patreon[/url]
  [size=22][b]Rules[/b][/size]
  [color=#E82A1F][size=18][b]- Keep chat app open at all times.[/b][/size][/color]
  [size=18][color=#E82A1F][b]- [u]PLEASE TURN YOUR LIGHTS ON[/u][size=16]
    when its night so other drivers can see you.[/size][/b][/color][/size]
  - Don't run into other cars on purpose.
  - Do not park or block the road.
    Pull off as much to the side as possible or return to pits.
  - Be respectful of other drivers, keep a comfortable distance
    when driving with others.
  - Don't drive into oncoming traffic. This is Japan.
    Drive on the left side of the road.
  - Don't cause drama in the chat. This includes spamming and
    harassment.
  - If you dont have Sol working, or are otherwise in doubt,
    keep your lights on.
Where can I find the CSP version IDs?
The easiest way to get the ID for the CSP Version you're using is opening Content Manager and navigating to Settings > Custom Shaders Patch > About & Updates and then reading the Currently active Shaders Patch version ID.

If you need the ID of a version you currently don't have installed the official CSP Website also has the IDs in the Other Versions sections.
