The Beginner's Guide
Introduction
This page will guide you through the initial setup process of setting up your own free-roam AssettoServer on a Windows machine.
We will be setting up our server using the full version of Content Manager, going over how to configure AI traffic, how to use a few settings to customize the server and learning how to troubleshoot some of the more common causes of server crashes.
Prerequisites
To follow along you will need the following things:
- The latest version of AssettoServer.
- The full version of Content Manager.
- The Shutoko Revival Project track.
- A
fast_lane.ai(p)made for Shutoko Revival Project. - Basic understanding of how text editors work.
Downloading the latest version of AssettoServer
-
Click on the
assetto-server-win-x64.zipin the Assets section of the release to download the file.
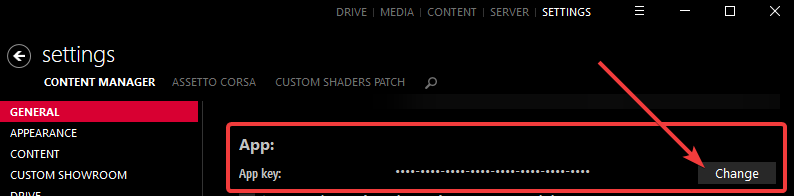
Purchasing the Full Version of Content Manager
You can host, configure, and play on the server without the full version of Content Manager.
For the sake of simplicity, we will be using the full version to generate the required files for us.
If you do not want to purchase the full version, you can use the Kunos Server manual as a reference to create them manually.
-
Purchase the full version of Content Manager via the official website or by being a patron of x4fabs Patreon.
-
Enter the key you received via email into Content Manager.
Downloading the Shutoko Revival Project track and AI spline
You can use any track that you have a fast_lane.ai(p) for.
In this guide, we will use the SRP track as it is one of the most popular tracks.
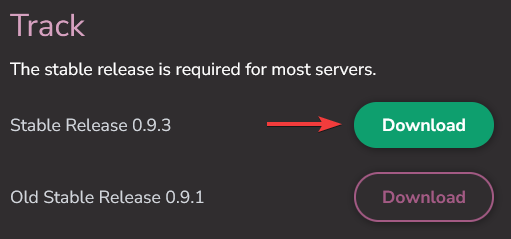
-
Go to the Shutoko Revival Project Website
-
Download and install the latest stable release.
If you need help with installing the track, please use the #help channel on the Shutoko Revival Project Discord
-
Join the AssettoServer Discord by clicking on the link in this sentence or the Discord logo in the navbar of this page.

-
Go into the #ai-spline-releases channel, open the
Pinned Messagesand download the spline made for Shutoko Revival Project.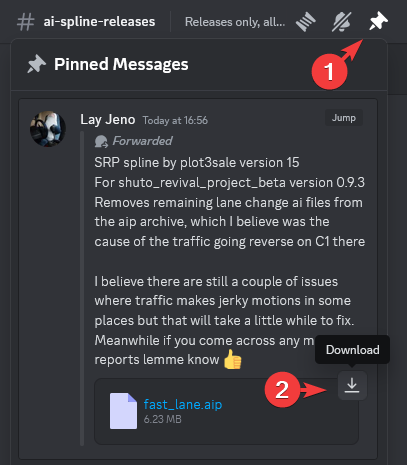
Initial Setup
Preconfiguration
For now, we will be using the minimum amount of cars needed for the default traffic settings of AssettoServer.
-
Start by navigating to the
Servertab of Content Manager
If you do not have this Menu enable it in the Content Manager settings like so: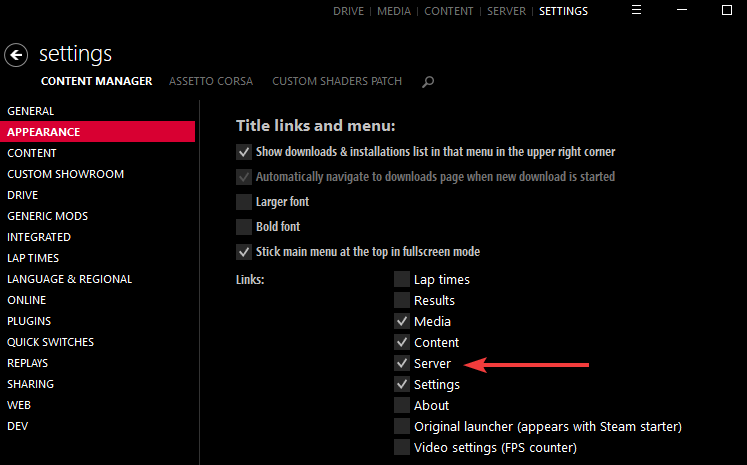
-
Click on
SERVER_00in the list on the left and then on theSERVER_00text field to change the name of the server.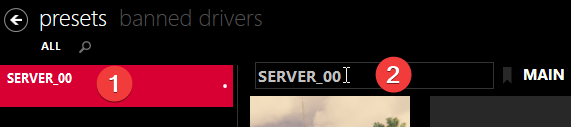
-
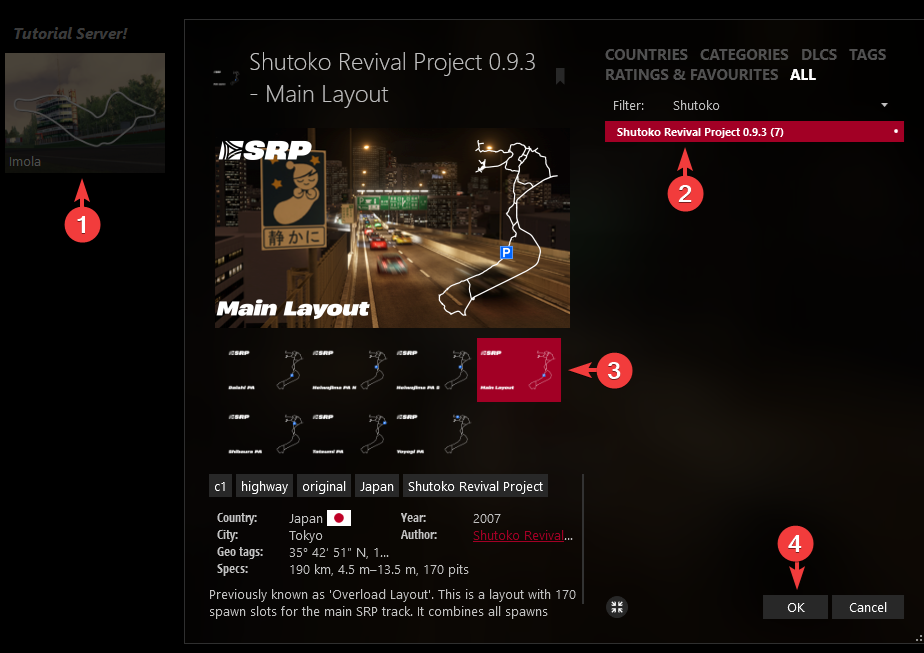
Click on the track preview image of Imola and change the track to Shutoko Revival Project - Main Layout.
-
Click on the
Admin passwordfield and enter a password that is at least 8 characters long. -
Enable the
Make server public (show on lobby)checkbox. -
Move the
Capacityslider to 11. -
Click on the
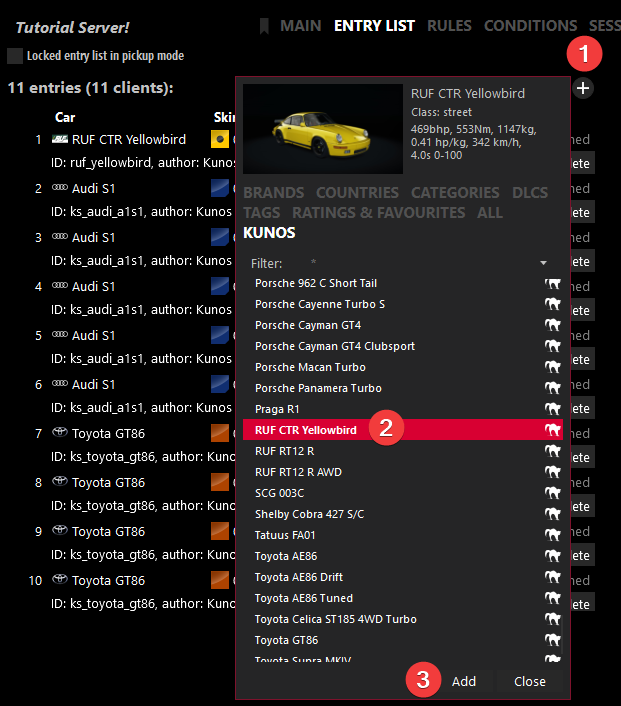
ENTRY LISTtab and click on the (+) to add cars to the list.
Add the following cars in this order:- 1 RUF CTR Yellowbird
- 5 Audi S1
- 5 Toyota GT-86
 caution
When adding more cars, remember to also increase the
Capacityslider, otherwise only the first 11 cars will get loaded.Only add as many cars as there are pits available for the layout of the track you've chosen.
The limit is displayed below theCapacityslider and for Shutoko Revival Project - Main Layout looks like this:
Ignoring this limit will result in the game crashing when joining the server.
-
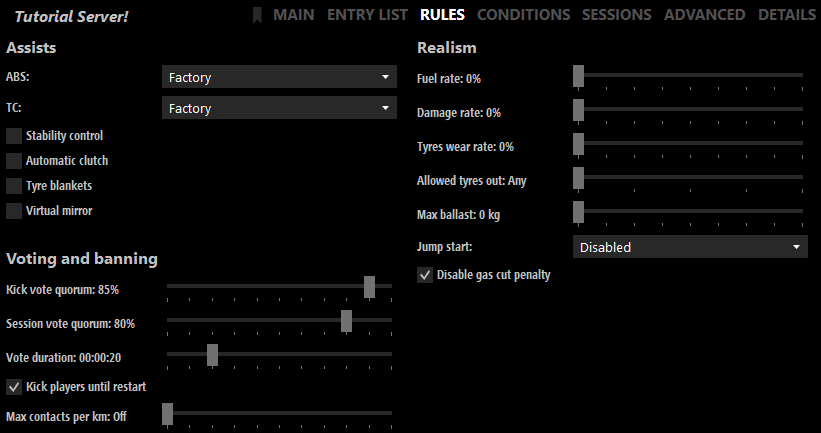
Click on the
RULEStab and configure the page how you see fit.Some recommendations:
- Uncheck
Virtual Mirroras this forces the Virtual Mirror to be on at all times, which can be undesired. - Move the
Allowed tyres outslider to the left into theAnyposition.
We will be using the following settings:
- Uncheck
-
Open the
CONDITIONStab and configure the page how you see fit.
Leave the bigTimeandTime Multipliersliders as they are.- In the
Weathersection, flip the switch toWeatherFXand select the weather you want.
If the weather you want is not in the list, read theDedicated Folderversion of how to change the weather after the extracting step. - Click on the 3 little dots next to the weather drop down.
- Enable and set the Time/Date/Time multiplier that you want.
We will be using the following settings:
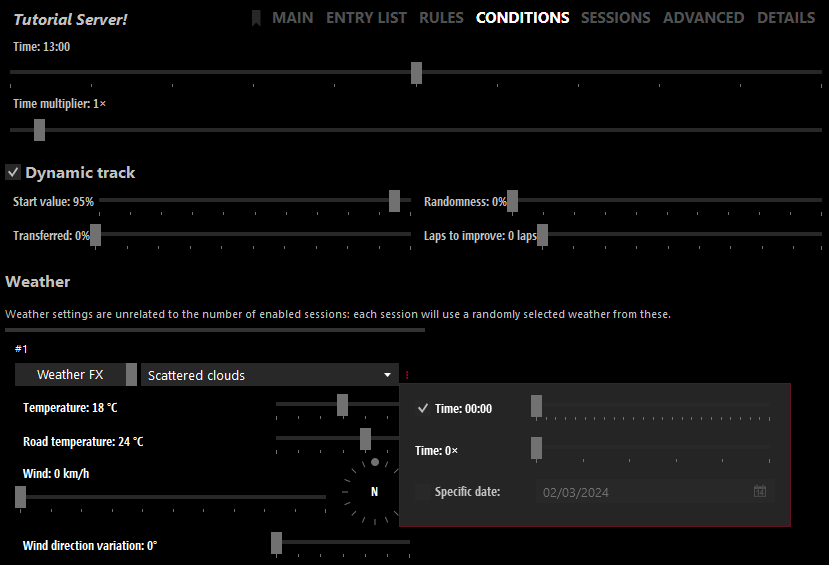
- In the
-
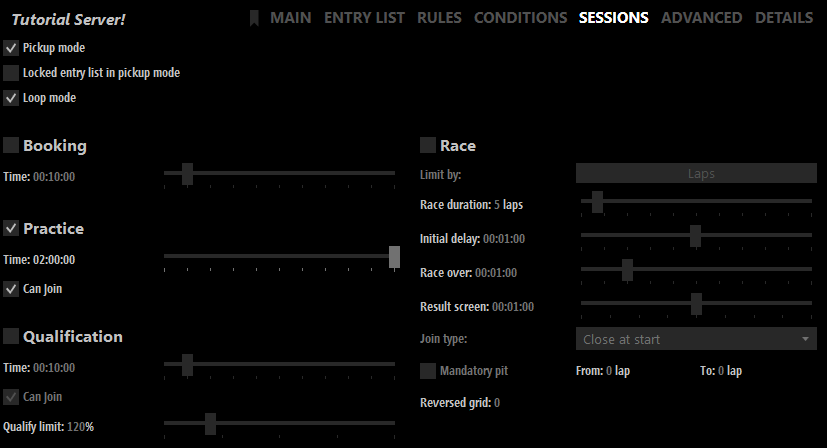
Open the
SESSIONStab and configure it as follows:
- Check
Pickup modeandLoop modewhile leavingLocked entry list in pickup modeunchecked. - Uncheck
Booking,QualifyingandRace. - Set
Practiceto something reasonable like 2 hours. You can make sessions longer than that but a length of 999999999 will likely cause problems and is not necessary.
We will be using the following settings:
-
At the bottom of the preset, click on
Save.
Selecting where to run the server
You can run the server in two ways: inside Content Manager or from a dedicated folder.
Running it inside Content Manager is the quickest way to get started, while using a dedicated folder offers better portability and more flexibility for advanced setups.
Also, keep in mind that not all features of the original server are supported, so some of the settings shown in CM will not work as expected.
- Dedicated Folder
- Inside Content Manager
Packing the server preset
Now that we're done configuring the server, we can use the packing feature to export all files we need into a .zip file for us.
-
In the same bar that we just saved the server preset, click on
Pack. -
Select
Windowsas the target and uncheckInclude executableandPack into single exe-file. -
Click on
Packand save it.
Extracting AssettoServer and the packed preset
You should now have the following .zip files somewhere:
assetto-server-win-x64.zip- The server preset we just packed, called something like
<PresetName>-X-XXXXXXXX-XXXXXX.zip
Create a new folder and extract the content of both .zip files into it.
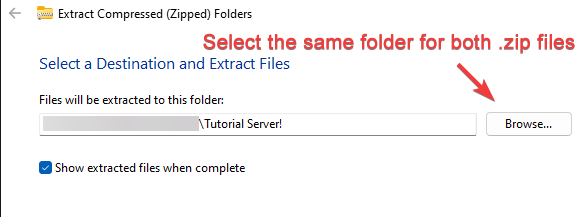
You should NOT have a folder named <PresetName>-X-XXXXXXXX-XXXXXX in your server folder.
If you do, move the folders inside of it into the main folder.
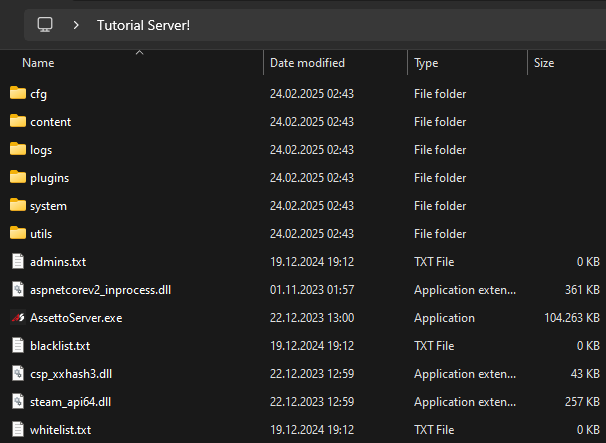
Your server folder should look like this:
Extracting AssettoServer and replacing acserver.exe
Navigate to the \server folder inside your Assetto Corsa installation.
By default, this folder is located in C:\Steam\steamapps\common\assettocorsa\server.
-
Extract
assetto-server-win-x64.zipinto theC:\Steam\steamapps\common\assettocorsa\serverfolder so that theAssettoServer.exeis in the same folder asacServer.exe. -
Rename
acServer.exeto something else. (acServer_default.exefor example) -
Rename
AssettoServer.exetoacServer.exe
First launch and basic AssettoServer traffic configuration
- Dedicated Folder
- Inside Content Manager
Start the server by double-clicking AssettoServer.exe.
In Content Manager, click on the Run button of the preset.
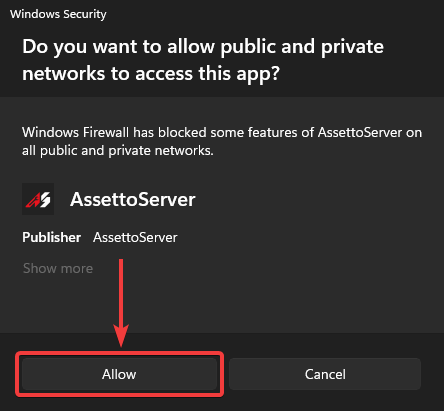
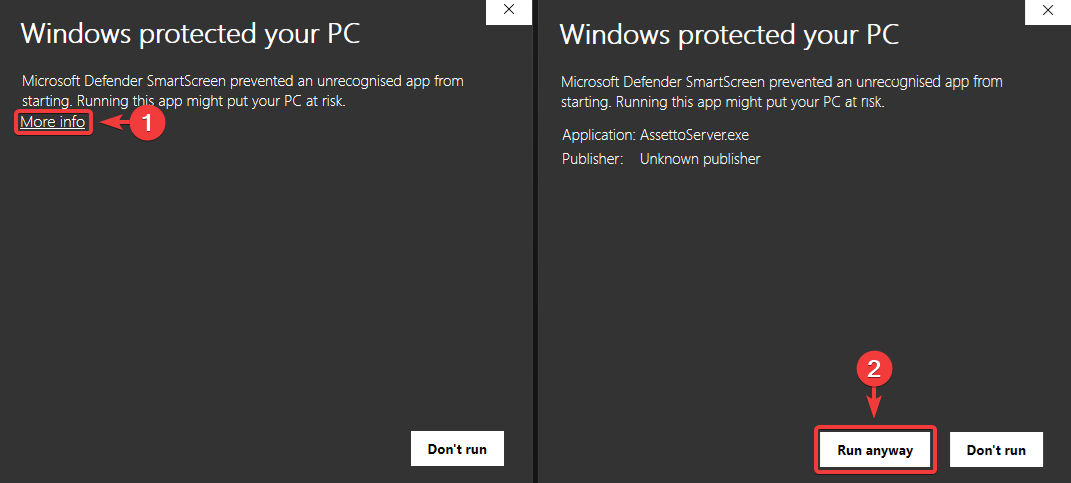
You might get the following pop up messages from Windows Firewall or Windows Defender:
- Windows Firewall
- Windows Defender
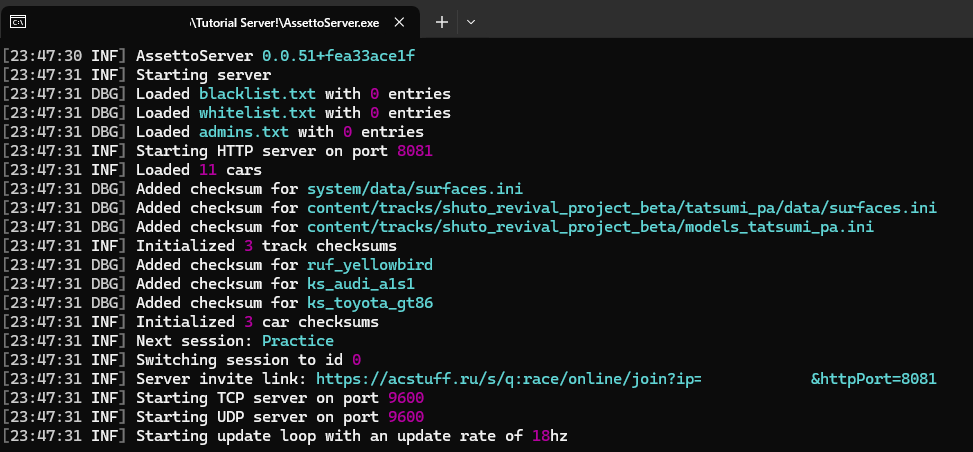
After allowing AssettoServer to launch, you should see something along the lines of this:
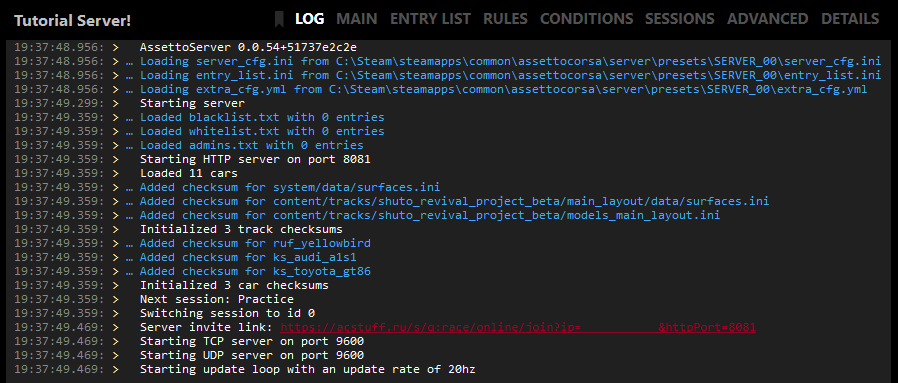
After allowing AssettoServer to launch, open the LOGS tab of the preset, you should see something along the lines of this:
You might also have the following error message inside of your log:
Your ports are not forwarded correctly. The server will continue to run, but players outside of your network won't be able to join.
To fix this, you'll need to go into your router settings and create Port Forwards for these ports:
Port 9600 UDP
Port 9600 TCP
Port 8081 TCP
Local IP: XXX.XXX.XXX.XXX
Router Page: http://XXX.XXX.XXX.X/
Since Instructions are different for each router, search in Google for "how to port forward" with the name of your router and/or ISP.
This means that you need to open the ports that AssettoServer uses inside your router and possibly make a exception for AssettoServer inside your firewall.
Because Instructions are different for every router / ISP, we will not explain how to do this here or on our Discord.
Refer to the user manual of your router or Google "how to port forward" with the name of your router and/or ISP.
- Close the terminal and navigate to the
cfgfolder inside the server's main folder.
- Click on the
Stopbutton, then clickFolderbutton at the bottom of the preset page.
-
Open the
extra_cfg.ymlusing a text editor of your choice and setEnableAi: true.extra_cfg.yml# Enable AI traffic
EnableAi: true -
Save and close the file, then open the
entry_list.ini.
For the first car, which will be the RUF that we want to drive, we will add a line belowRESTRICTOR=0.entry_list.ini[CAR_0]
MODEL=ruf_yellowbird
SKIN=00_yellowbird_black
SPECTATOR_MODE=0
DRIVERNAME=
TEAM=
GUID=
BALLAST=0
RESTRICTOR=0
AI=noneFor the remaining cars we will add the line
AI=fixedinstead since we want to use them as AI traffic.entry_list.ini[CAR_1]
MODEL=ks_audi_a1s1
SKIN=00_sepang_blue_pearl_effect_br
SPECTATOR_MODE=0
DRIVERNAME=
TEAM=
GUID=
BALLAST=0
RESTRICTOR=0
AI=fixed -
Save and close the file and then open the
server_cfg.ini.
Find the[PRACTICE]session and add a line withINFINITE=1to it.server_cfg.ini[PRACTICE]
NAME=Practice
TIME=120
IS_OPEN=1
INFINITE=1This will make the session infinitely long without resetting the session and sending everyone to pits when the 2 hours are up.
Keep in mind that Content Manager and apps will show atime left, which is normal and doesn't mean that it's not working.
-
After saving and closing the file, navigate to the content folder of the track, which is
\<ServerName>\content\tracks\shuto_revival_project_beta.
Create a new folder calledaiand place thefast_lane.aipwe downloaded earlier inside of it.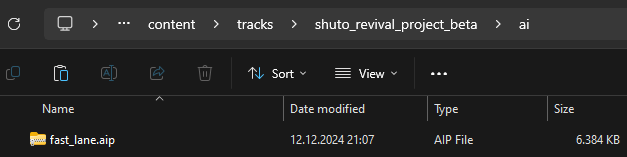
-
Now go back into the main folder of the server and launch
AssettoServer.exeagain.
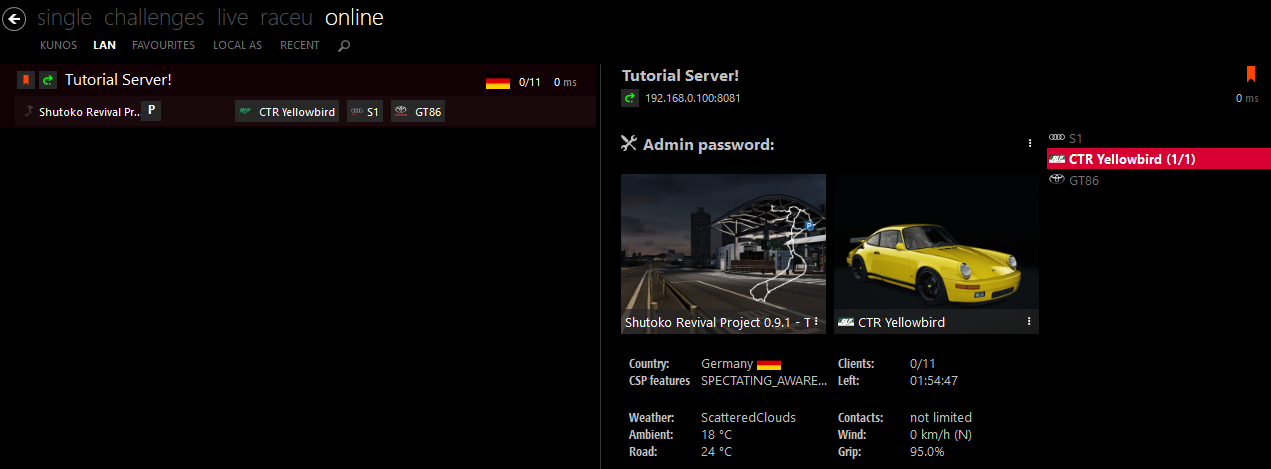
Then open Content Manager and go to theDrivetab, select theOnlinetab and then theLANtab.
The server will now appear in the server list. It may take a few moments, so you might need to refresh the list a few times.
-
After saving and closing the file, navigate to the content folder of the track, which is
\<ServerName>\content\tracks\shuto_revival_project_beta.
Create a new folder calledaiand place thefast_lane.aipwe downloaded earlier inside of it. -
Now go back to the preset and click on the
Runbutton again.
Then go to theDrivetab, select theOnlinetab and then theLANtab.
The server will now appear in the server list. It may take a few moments, so you might need to refresh the list a few times.
-
Select the RUF, click
Joinand drive out of the pits to start spawning AI traffic. -
Other people will also be able to join the server by searching for it or via the invite link that you can copy from the server log.
cautionDo not click on the
Invitebutton to copy the invite link, it will copy your local IP which will only work on your local network.
Use the invite link that is generated in the terminal instead.
Advanced Server Configuration
Time and Date
- Dedicated Folder
- Inside Content Manager
We selected time and date settings during the preconfiguration, but what if we wanted to change the time/time multiplier/date without having to pack and extract again?
-
Navigate to the
cfgfolder of the server and open theserver_cfg.iniwith a text editor of your choice. -
Find the
GRAPHICS=parameter in the[WEATHER_0]section, it should look something like this:server_cfg.ini[WEATHER_0]
GRAPHICS=sol_03_scattered_clouds_type=17_time=0_mult=0
BASE_TEMPERATURE_AMBIENT=18
BASE_TEMPERATURE_ROAD=6
VARIATION_AMBIENT=0
VARIATION_ROAD=0
WIND_BASE_SPEED_MIN=0
WIND_BASE_SPEED_MAX=0
WIND_BASE_DIRECTION=0
WIND_VARIATION_DIRECTION=0-
To change the Time, change the number after
_time=to the time you want in seconds from 00:00.
For example to set the time to18:00you would do_time=64800. -
To change the Time Multiplier, change the number after
_mult=.
_mult=1would result in time progressing as fast as in real life,_mult=2would be twice as fast etc. -
To change the Date you'll need to do two things:
- Change the number after
_start=to the date you want in Epoch time.
Use a site like epochconverter to get the Epoch time that you want.
For example:_start=1719700000would result in the date being June 30th, 2024.
- Change the number after
-
-
After making these adjustments it should look something like this:
server_cfg.ini[WEATHER_0]
GRAPHICS=sol_03_scattered_clouds_type=17_time=64800_mult=0_start=1719700000
BASE_TEMPERATURE_AMBIENT=18
BASE_TEMPERATURE_ROAD=6
VARIATION_AMBIENT=0
VARIATION_ROAD=0
WIND_BASE_SPEED_MIN=0
WIND_BASE_SPEED_MAX=0
WIND_BASE_DIRECTION=0
WIND_VARIATION_DIRECTION=0With these settings the server will start at 18:00 on the 30 June 2024 and the time will not progress.
We selected time and date settings during the preconfiguration, but what if we wanted to change the time/time multiplier/date?
- Open the
Conditionstab of your preset. - Click on the 3 little dots next to the weather drop down and change the time and date to your liking.
A Example is shown in Step 9 of the Preconfiguration section. - Click on the
Savebutton and then on theRestartbutton.
Weather
Players joining without a Custom Shaders Patch preview version installed will not see rain.
Rain does not come with Sol or Pure. Rain is part of the paid preview versions of Custom Shaders Patch.
Purchase Custom Shaders Patch previews on x4fabs Patreon.
- Dedicated Folder
- Inside Content Manager
-
Navigate to the
cfgfolder of the server and open theserver_cfg.iniwith a text editor of your choice. -
Find the
[WEATHER_0]section, it should look something like this:server_cfg.ini[WEATHER_0]
GRAPHICS=sol_03_scattered_clouds_type=17_time=0_mult=0
BASE_TEMPERATURE_AMBIENT=18
BASE_TEMPERATURE_ROAD=6
VARIATION_AMBIENT=0
VARIATION_ROAD=0
WIND_BASE_SPEED_MIN=0
WIND_BASE_SPEED_MAX=0
WIND_BASE_DIRECTION=0
WIND_VARIATION_DIRECTION=0 -
Under
[WEATHER_0]find the parameterGRAPHICS=and change the WeatherFX ID after_type=to the ID of the weather you want.
If you're unsure which ID to use, please check the list of available WeatherFX type IDs.
For example, to change the starting weather to beHeavy Raininstead ofScattered Clouds, it would look like this:server_cfg.ini[WEATHER_0]
GRAPHICS=sol_03_scattered_clouds_type=8_time=0_mult=0 -
Save and restart the server to apply the changes.
- Open the
Conditionstab of your preset. - Click on the weather drop down and change the weather to your liking.
A Example is shown in Step 9 of the Preconfiguration section. - Click on the
Savebutton and then on theRestartbutton.
If you just want Rain graphics without the physics, add the following to your csp_extra_options.ini.
[EXTRA_RULES]
DISABLE_RAIN_PHYSICS=1
CSP Extra Server Options
Requiring a minimum CSP Version
AssettoServer requires CSP version 0.1.77 (1937) by default.
- Dedicated Folder
- Inside Content Manager
To change this, edit MinimumCSPVersion: 1937 in the extra_cfg.yml.
If you want to require a different CSP version and don't know how where to get the ID from, read this FAQ section.
Navigate to the cfg folder of the server and create a file called csp_extra_options.ini and paste the CSP Extra Options that you want to use.
To change this, enable Require CSP to join in the Main tab of the preset, then change the ID inside the Minimum version field.

If you want to require a different CSP version and don't know how where to get the ID from, read this FAQ section.
To disable the requirement, make sure Require CSP to join is disabled, then click on the Folder button and open the extra_cfg.yml to remove the default version:
# Override minimum CSP version required to join this server. Leave this empty to not require CSP.
MinimumCSPVersion:
Click on the Extra Options button and paste the CSP Extra Options that you want to use.
The CSP Wiki has a long list of options and settings you can use.
Two of the more useful options for Freeroam servers are listed below.
 [EXTRA_RULES]
 ALLOW_WRONG_WAY = 1   ; Allow cars to drive either way, gets rid of the wrong way sign on some tracks

 [PITS_SPEED_LIMITER]
 DISABLE_FORCED = 0    ; Disable forced pits speed limiter
 KEEP_COLLISIONS = 0   ; Activate collisions between cars in pits
 SPEED_KMH = 120       ; Alter pits speed limiter value; default is 80
Extra steps for teleportation and color changing
For teleportation and color changing there are additional steps:
-
Navigate to the
cfgfolder and open theentry_list.ini. -
Each car has a
SKIN=line that needs to be edited to allow that car to use these features.
The following codes need to be added to the skin line:Code Usage /ACA3Allow Teleporting /ABAHAllow Color Changing /ADAnAllow both Color Changing & Teleporting This is NOT a full list of all codes and options available, just some of the most frequently used ones.
Meaning, if we wanted to use teleportation and color changing it would look like this:
entry_list.ini[CAR_0]
MODEL=ruf_yellowbird
SKIN=00_yellowbird_black/ADAnIf we wanted to also allow our AI cars to spawn in different colors, we would have to at least add
/ABAHto each of the car's skin lines since we don't care about teleportation for them. -
Now we are ready to add options to our
csp_extra_options.inifile.So, with color changing and teleportation the file looks like this:
csp_extra_options.ini[EXTRA_RULES]
ALLOW_WRONG_WAY = 1 ; Allow cars to drive either way, gets rid of the wrong way sign on some tracks
[PITS_SPEED_LIMITER]
DISABLE_FORCED = 0 ; Disable forced pits speed limiter
KEEP_COLLISIONS = 0 ; Activate collisions between cars in pits
SPEED_KMH = 120 ; Alter pits speed limiter value; default is 80
[CUSTOM_COLOR]
ALLOW_EVERYWHERE = 1 ; change car colors anywhere as long as the car is stopped.
[TELEPORT_DESTINATIONS]
POINT_1 = Position 1
POINT_1_GROUP = Shibaura PA
...You can find the teleports used on the Official Shutoko Revival Projects servers in this FAQ Section
-
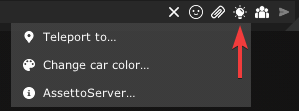
Save and close the file and restart the server. Now you will be able to teleport / change your car color via the lightbulb in the chat app and will have traffic that is randomly colored.
-
Open the
ENTRY LISTtab of your preset. -
Click on the
CSPbutton and enable the features you want to allow for the car: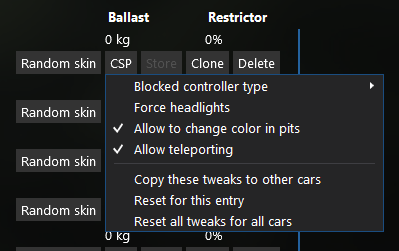
-
So, with color changing and teleportation the pop up will look like this:
Extra Options[EXTRA_RULES]
ALLOW_WRONG_WAY = 1 ; Allow cars to drive either way, gets rid of the wrong way sign on some tracks
[PITS_SPEED_LIMITER]
DISABLE_FORCED = 0 ; Disable forced pits speed limiter
KEEP_COLLISIONS = 0 ; Activate collisions between cars in pits
SPEED_KMH = 120 ; Alter pits speed limiter value; default is 80
[CUSTOM_COLOR]
ALLOW_EVERYWHERE = 1 ; change car colors anywhere as long as the car is stopped.
[TELEPORT_DESTINATIONS]
POINT_1 = Position 1
POINT_1_GROUP = Shibaura PA
...You can find the teleports used on the Official Shutoko Revival Projects servers in this FAQ Section
-
Close the popup, click
SaveandRestarton your preset. Now you will be able to teleport / change your car color via the lightbulb in the chat app and will have traffic that is randomly colored.
AssettoServer Plugins
AssettoServer comes with a few free to use plugins, we'll look at how to enable and configure two:
The AutoModerationPlugin and the RandomWeatherPlugin.
You can add as many or as few as you want, just make sure to carefully read the documentation pages as some plugins might require certain things or won't work together.
You can enabled and configured several plugins at once to cut down on the number of times you need to restart the server.
However setting them up one by one like we will, makes it easier to find issues if something goes wrong.
When editing plugin configurations, be careful to keep the formating intact. The indentation of each line matters, and the server will crash if it is wrong.
- Dedicated Folder
- Inside Content Manager
AutoModerationPlugin
- Navigate to the
cfgfolder of the server and open theextra_cfg.yml.
- Click on the
Folderbutton and open theextra_cfg.yml.
-
Find
EnablePlugins:and enable the plugin:extra_cfg.yml# List of plugins to enable
EnablePlugins:
- AutoModerationPlugin -
Save the file and launch the server once to generate the plugin configuration file.
-
Open the
plugin_auto_moderation_cfg.ymlthat should now be next to theextra_cfg.yml.
SetEnabled: truefor the features you want and save the file, it should look something like this:plugin_auto_moderation_cfg.yml# yaml-language-server: $schema=schemas\plugin_auto_moderation_cfg.schema.json
# Kick players that are AFK
AfkPenalty:
# Set to true to enable
Enabled: true
# Don't kick if at least one open slot of the same car model is available
IgnoreWithOpenSlots: true
# Time after the player gets kicked. A warning will be sent in chat one minute before this time
DurationMinutes: 10
# Set this to MinimumSpeed to not reset the AFK timer on chat messages / controller inputs and require players to actually drive
Behavior: PlayerInput
# Kick players with a high ping
HighPingPenalty:
# Set to true to enable
Enabled: true
# Time after the player gets kicked. A warning will be sent in chat after half this time
DurationSeconds: 20
# Players having a lower ping will not be kicked
MaximumPingMilliseconds: 500
# Penalise players driving the wrong way. AI has to enabled for this to work
WrongWayPenalty:
# Set to true to enable
Enabled: true
# Time after the player gets kicked. A warning will be sent in chat after half this time
DurationSeconds: 20
# Players driving slower than this speed will not be kicked
MinimumSpeedKph: 20
# The amount of times a player will be send to pits before being kicked
PitsBeforeKick: 2
# Penalise players driving without lights during the night
NoLightsPenalty:
# Set to true to enable
Enabled: true
# Time in which no warning or signs will be sent
IgnoreSeconds: 2
# Time after the player gets kicked. A warning will be sent in chat after half this time
DurationSeconds: 60
# Players driving slower than this speed will not be kicked
MinimumSpeedKph: 20
# The amount of times a player will be send to pits before being kicked
PitsBeforeKick: 2
# Penalise players blocking the road. AI has to be enabled for this to work
BlockingRoadPenalty:
# Set to true to enable
Enabled: true
# Time after the player gets kicked. A warning will be sent in chat after half this time
DurationSeconds: 30
# Players driving faster than this speed will not be kicked
MaximumSpeedKph: 5
# The amount of times a player will be send to pits before being kicked
PitsBeforeKick: 2If we wanted to, we could now further adjust the plugin config, we will be leaving it as is for now.
RandomWeatherPlugin
- Navigate to the
cfgfolder of the server and open theextra_cfg.yml.
- Click on the
Folderbutton and open theextra_cfg.yml.
-
Find
EnablePlugins:and enable the plugin like so:extra_cfg.yml# List of plugins to enable
EnablePlugins:
- AutoModerationPlugin
- RandomWeatherPlugin -
Save the file and launch the server once to generate the plugin configuration file.
-
Open the
plugin_random_weather_cfg.ymlthat should now be next to theextra_cfg.yml.
We will edit theWeatherWeightsto only allow forClear,FewClouds,ScatteredClouds,BrokenCloudsandOvercastCloudslike so:plugin_random_weather_cfg.yml# yaml-language-server: $schema=schemas\plugin_random_weather_cfg.schema.json
# Weights for random weather selection, setting a weight to 0 blacklists a weather, default weight is 1
WeatherWeights:
LightThunderstorm: 0
Thunderstorm: 0
HeavyThunderstorm: 0
LightDrizzle: 0
Drizzle: 0
HeavyDrizzle: 0
LightRain: 0
Rain: 0
HeavyRain: 0
LightSnow: 0
Snow: 0
HeavySnow: 0
LightSleet: 0
Sleet: 0
HeavySleet: 0
Clear: 1
FewClouds: 1
ScatteredClouds: 1
BrokenClouds: 1
OvercastClouds: 1
Fog: 0
Mist: 0
Smoke: 0
Haze: 0
Sand: 0
Dust: 0
Squalls: 0
Tornado: 0
Hurricane: 0
Cold: 0
Hot: 0
Windy: 0
Hail: 0
# Minimum duration until next weather change
MinWeatherDurationMinutes: 5
# Maximum duration until next weather change
MaxWeatherDurationMinutes: 30
# Minimum weather transition duration
MinTransitionDurationSeconds: 120
# Maximum weather transition duration
MaxTransitionDurationSeconds: 600 -
Save and close the file then restart the server.
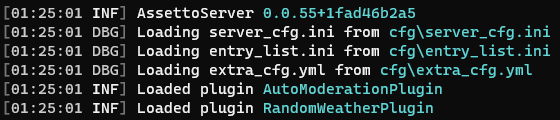
If you did everything correctly you will see two new lines at the beginning of the server log:
This covers how to enable and configure plugins.
Troubleshooting Basics
If at some point something goes wrong and the server no longer starts properly, there a few way to figure out what went wrong and how to fix it. We will be looking at one of the more common reasons for a server crash in this example but learning what to look for can help you figure out how to fix any problem.
If the terminal window just closes when you try to start the server there will always be a server logfile in the logs folder and a crash logfile in the crash folder that you can read!
Server logs will be generated in the logs folder of the server.
They will be generated as log-20230706.txt with the part after log- being the date the log was written.
Before I continue I want to explain a few thing that can be useful to cut down on how much you have to read in order to understand.
Each line in the log will have some information in the beginning: YEAR-MONTH-DAY HR:MIN:SEC.MILS TIMEZONE(+/- UTC) [TYPE]
We only really care about the type and actual message, so here is a little cheatsheet:
| Message Type | Meaning |
|---|---|
[DBG] | Debug, can be ignored |
[INF] | Information, can also be ignored |
[WRN] | Warning, might be important but can usually be ignored as well |
[ERR] | Error, an error the server can recover from and keep running. |
[FTL] | Fatal, an error causing the server to terminate. |
While [INF], [DBG] and [WRN] might have hints for other problems, in our example we will focus on the [ERR] and [FTL] messages.
Example #1 - Missing AI spline
Now, I want you to look at the log in the image below and try to read the log until you find something that might give you a idea about what is causing the server to crash.
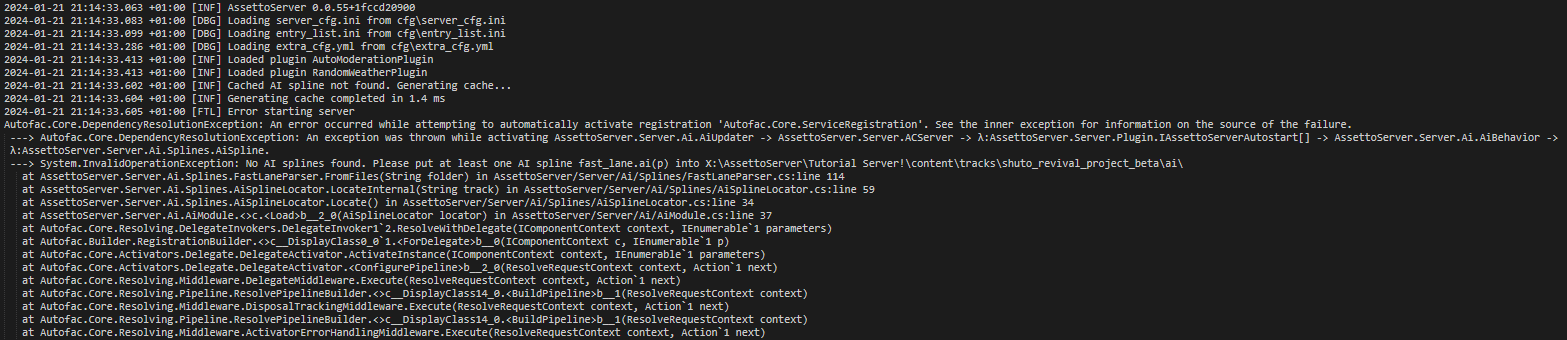
At first this might seem like a lot of scary text and that doesn't really change even if we narrow it down the the [FTL] message.
But if we actually try and read a few lines we can spot something we will be able to understand:

This line tells us everything we need to know, so we can ignore the rest of the message.
No ai folder found. Please put at least one AI spline fast_lane.ai(p) into \content\tracks\shuto_revival_project_beta\ai\
Apparently we failed to place a AI spline in the correct folder.
Moving the fast_lane.aip into the folder that is shown in the log message (or creating the folder if needed), will get rid of this error and should let the server start without problems.
Example #2 - Syntax error in config file
Since we enabled and configured some plugins earlier on, let's look at an example that has something to do with that.
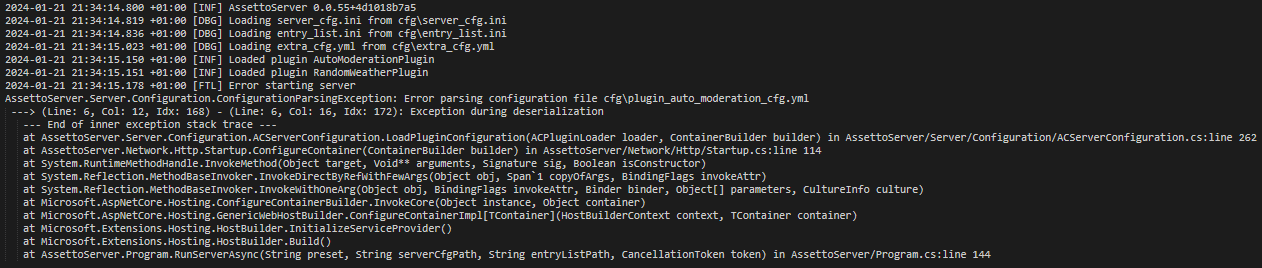
While this looks a lot different and it doesn't provide a helpful message telling us what to do as before, it is actually easy to understand.
Error parsing configuration file cfg\plugin_auto_moderation_cfg.yml --> (Line: 6, Col: 16, Idx: 172)
From this line we can tell that something went wrong parsing the plugin_auto_moderation_cfg.yml file.
So lets open the plugin_auto_moderation_cfg.yml and take a look at Line 6

At first glance, especially if you don't use a text editor that has syntax highlighting, it might look like there is nothing wrong here.
But looking closer, we can see that we made a typo when enabling HighPingKick, correcting the Enabled: ture to Enabled: true and saving the file will get rid of this error and should let the server start without problems.
Updating the Server
In general, it is recommended to start fresh instead of simply overwriting files when updating AssettoServer.
-
Backup your current server files and download the latest release. (or the version you want to update to)
-
Create a new folder for the updated server and extract the new AssettoServer files as explained back in this section.
-
From your old server, only copy and re-use files that are not
extra_cfg.ymlorplugin_<plugin_name>_config.yml. -
Run the updated
AssettoServer.exeonce to generate a updatedextra_cfg.yml. -
Use the backup of your old
extra_cfg.ymlto reconfigure theextra_cfg.ymlof the updated server. -
If you had any plugins enabled, restart the updated server once to generate new plugin config files and then reconfigure them.
The parameters inside extra_cfg.yml and plugin config files may change between versions.
If you overwrite the file with one from a older version or change / restore parameters manually, the server may stop working.
How to Ask for Help
If you have a question or run into a problem that you can't figure out yourself, feel free to join the AssettoServer Discord and ask for help.
Before that though, please make sure to read the Introduction, FAQ and Common configuration errors pages as they answer a lot of common questions.
If you need help with setting up your server please use #server-troubleshooting.
Posting your problem in #bug-reports or #general will ususally result in the message being ignored or deleted.
Help Us Help You
Use the Search function.
It's more than likely that whatever problem you're having, someone else did too and already asked how to fix it.
While Discords search is not known for being good, it should still give you something you can read through to see if your problem can be resolved the same way.
Pressing CTRL + F while in the #server-troubleshooting channel will narrow down results to only this channel.
After that type in something short, like the beginning sentence of a error message for example.
Then look over the results and see if anything matches what you are looking for.
If you found a message you want to take a closer look at, hover over the message and click on the Jump button.

You will be moved to when the message was sent so you can read over the full chat history.
If there are no results, or if nothing mentioned in the conversations helped to fix your problem, you can also try jumping to another message or removing the in:#server-troubleshooting to search the entire Discord.
If all of that is unsuccessful you can then move on to formulating your own message.
Don't ask to ask.
Hey, anyone here that can help me?
These messages usually result in nobody responding to them because it can also be read as:
I have a question but I'm too lazy to actually formalize it into words unless there's someone in the channel who wants to spend time answering it.
The solution is not to ask to ask, but just to ask. Someone who is idling in the channel and only every now and then glances at what's going on is unlikely to answer to your "asking to ask" question, but if you actually describe your problem it may get them to respond because you (hopefully) already provided all the information they needed to help you.
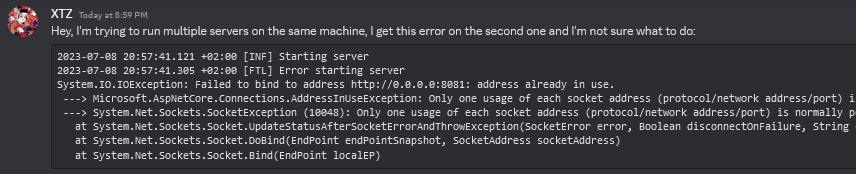
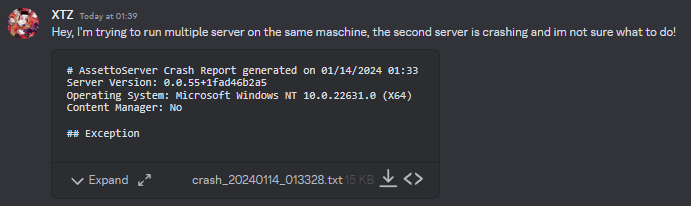
Provide as much information as you can, and format it so that it is easily readable.
Server crashing, help what do?
This is just as bad as asking to ask because it requires people to ask you for more details in order to narrow down the problem.
Try explaning the problem and what you have already tried to fix the problem.
Include the server crash log by uploading the crash_XXXXXXXX_XXXXXX.txt from the crash folder of the server.
Screenshots of files can leave out important information and are generally harder to read.
If you just want to copy a few lines, use Discord's markdown feature to put it into a codeblock for easier readablitiy.
This can be done by surrounding it with ``` like this: ```Text```
Some example messages that are easy to read: